TABLE OF CONTENTS
- Using the Bulk import tool to import files and reports
- Displaying reports under the correct filters in the report archive
- Matching reports to the correct students
- Categorisations for reports when viewed in SEQTA Learn and SEQTA Engage
- Categorisations for reports in the SIP
- Related articles:
The Bulk import... tool is used to import student files and reports (eg. Naplan, Music reports) from a ZIP folder into the Report archive in SEQTA. These can then be accessed through the SIP and can also be set to display in SEQTA Learn and SEQTA Engage.
Please refer to the sections below prior to importing reports to ensure the files are appropriately named to include sufficient information to match students and identify what the report contains.
Using the Bulk import tool to import files and reports
- Prepare the files which will be uploaded to the student record in the SIP.
- Create a filename structure and decide on the filename part separator.
- Plan for categorisations: Timetable period, Report type, Year level, enclosing folder.
- Go to the Administration workspace > Academic reports > Report archive.
- Click the Bulk Import... button found at the top of the window area.
- Click Add a file. Select the location of the Zip folder (eg. My Device) or Dropbox and find the Zip file. Next, select the zip file and click OK or Open. Drag and drop is also available for the ZIP file.
- The contents of the ZIP file will be expanded and displayed as rows in the window.
- If there are any issues once the file is selected, check the file itself to ensure it is a ZIP file and not a different file type.
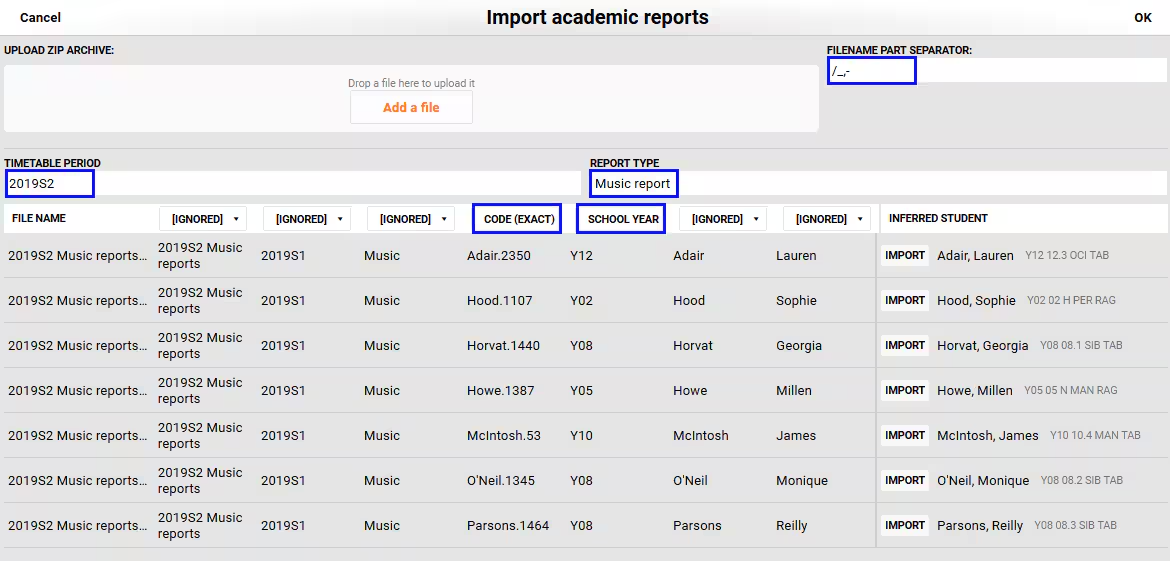
- Type in a label for Timetable period and Report type. Where possible, use an existing timetable period or report type, otherwise make up a the report type, and be sure to use it each time files are uploaded (eg. 'Naplan' or 'Music report').
- If the rows don't separate into columns, you may need to add your selected character into the Filename part separator box.
- Avoid using hyphens or fullstops as a separator, as this can cause issues with hyphenated names and some codes.
- Select the column heading that correlates to the data in the column. If using the student's code (Code (exact)), do not select student firstname or surname.
- NOTE: Depending on the number of characters and your device screen size, the column headings will sometimes be offset from the data.
- Confirm that the Inferred student is a correct match for each row.
- If there are no suitable candidates found the files in the ZIP will need to be renamed to include the code then imported separately.
- Click OK
- (Optional) Follow the steps in the article Displaying Academic Reports or Archived Documents in SEQTA Learn and SEQTA Engage
Displaying reports under the correct filters in the report archive
When archiving using the Bulk import tool... ensure a valid Timetable period and Report type are entered. If unsure as to which Report type to enter, check under the existing filters.
Matching reports to the correct students
The best way to match the document to the correct student is to include the student code in the filename. This will ensure the system matches the students correctly. If this is not possible, it may be necessary to manually rename files for students with the same name to include the code and them import separately.
If you plan to make the uploaded documents available to parents, we recommend you include the student's first name and surname, as this is more meaningful to parents than the code.
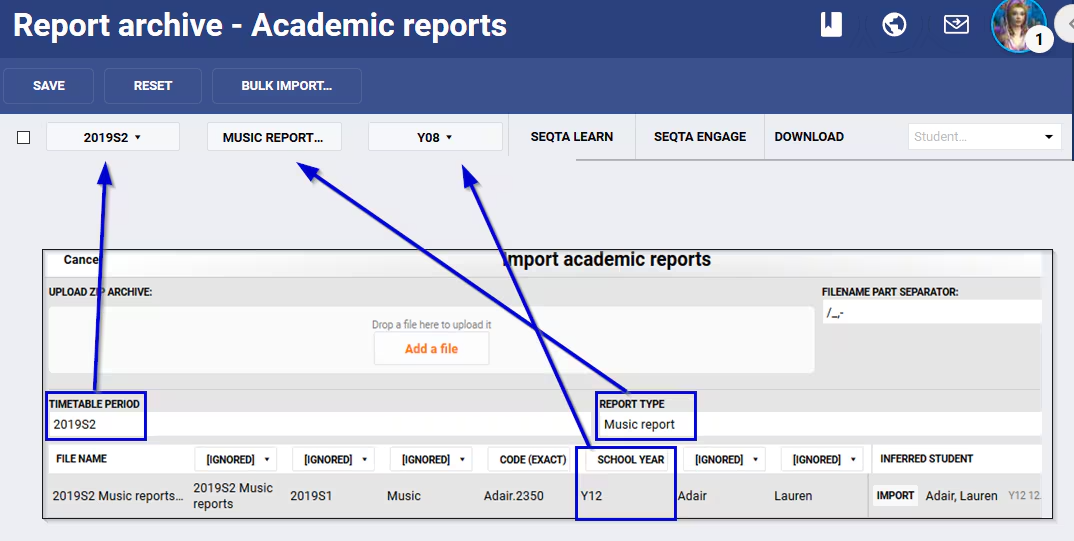
Categorisations for reports when viewed in SEQTA Learn and SEQTA Engage
The School year, Timetable period and Report type display in SEQTA Learn and SEQTA Engage. The timetable period and report type are entered when using the bulk import wizard. However, the school year is drawn from the file name and will only display if there is a year record with that code found in SEQTA Data management.
Categorisations for reports in the SIP
If files are placed in a folder, then that folder zipped, then the folder name will display before the filename when displayed in the SIP. This is a simple way to add a category to a large number of files.
Related articles:
Was this article helpful?
That’s Great!
Thank you for your feedback
Sorry! We couldn't be helpful
Thank you for your feedback
Feedback sent
We appreciate your effort and will try to fix the article