TABLE OF CONTENTS
- Process Summary for Creating and Cloning Calendar Classes
- Creating Calendar Classes
- Creating Additional Instances of a Class
- Editing Calendar classes
- Cloning Calendar Classes
- Enrolling Students into Calendar Classes
- Deleting Calendar Classes
- Calendar Class Permissions
Calendar Classes are classes created through the Teaching Workspace under the 'Calendar' sub-page. The setup process for creating and cloning Calendar Classes are outlined below.
Process Summary for Creating and Cloning Calendar Classes
- Create the first instance of the Calendar Class for the week.
- Add any additional classes by click-dragging on the timetable and then selecting the class from the list.
- Clone the classes to the end of the timetable period or final date the class.
Creating Calendar Classes
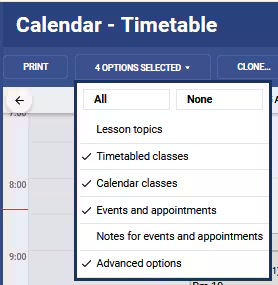
- Go the the Teaching Workspace > Timetable > Calendar.
- Ensure the option 'Calendar Classes' is selected from the drop-down.
- Click-drag on the timetable to create the class for the required time period
- Select 'New Class' or click on an existing class and select 'Edit' entry. (Pencil icon)
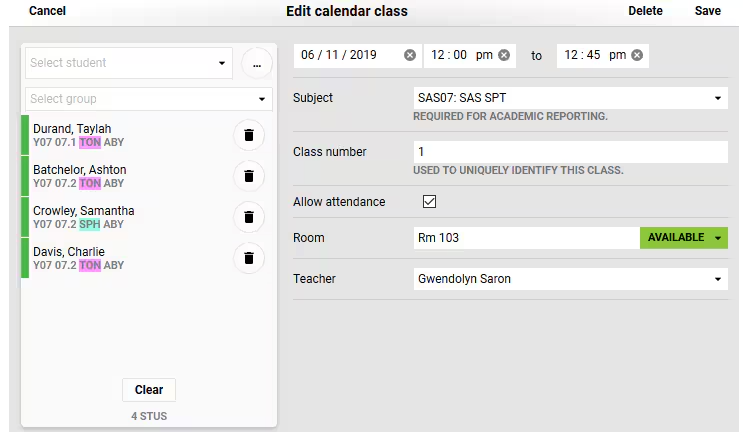
- Set the application options for the class:
- If there is no available subject or room this can be created through the Data Management page or through the school's timetabling system.
- The class number is used in instances where there is more then one class in the cohort.
- Select the students to be enrolled into the class.
- Click 'Save'.
Creating Additional Instances of a Class
If the class is going to run more than once a week (or two weeks depending on the cycle) then additional instances can be created.
- Go the the Teaching Workspace > Timetable > Calendar.
- Click-drag on the timetable to create the additional class.
- Select the class from the drop-down.
- Configure the class as required.
- Click 'Save'.
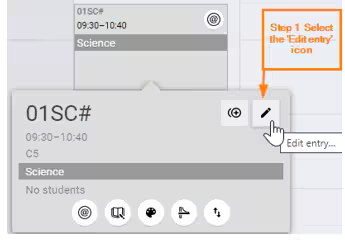
Editing Calendar classes
- Go the the Teaching Workspace > Timetable > Calendar.
- Ensure the option Calendar Classes is selected from the drop-down
- Click on the class you would like to edit, then select the Edit entry icon (Pencil icon)
- Edit the class as required
- Click 'Save'
If there are any change to class times, which overlap with existing classes. It's necessary to delete future class instances (those from the target period), to avoid doubling up.
Cloning Calendar Classes
The 'Clone' option is used to clone one week of classes (or two depending on the cycle) onto a target date range.
When cloning classes after editing the class times, the class instances in the target range need to be removed before cloning to prevent double-ups.
- Go the the Teaching Workspace > Timetable > Calendar
- Select one of the following:
- Click the 'Clone' button on the toolbar to clone class across weeks.
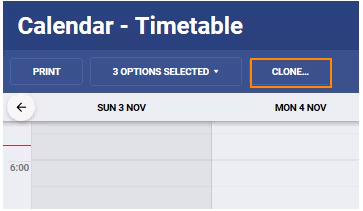
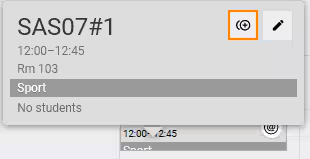
- Click on 'Clone' icon on the class to clone a class instance from one day to another.
- Click the 'Clone' button on the toolbar to clone class across weeks.
- Select the class or classes you would like to clone from the list on the right-hand side.
- Under 'Source', change the date range. This should encompass one cycle of your timetable. Typically, this is one week (Sun-Sat), but does vary for schools with longer cycles or rolling cycles.
- Under 'Target', ensure the correct date range is selected. This will typically be from the day after the end date of the source range to the end of the timetable period.
- If cloning to a new timetable period, select 'Advanced Options' from the bottom of the dialogue box and choose whether to bridge classes and whether to create classes on non-teaching days.
- Click 'Save'. Check that the classes look correct on the teacher's timetable.
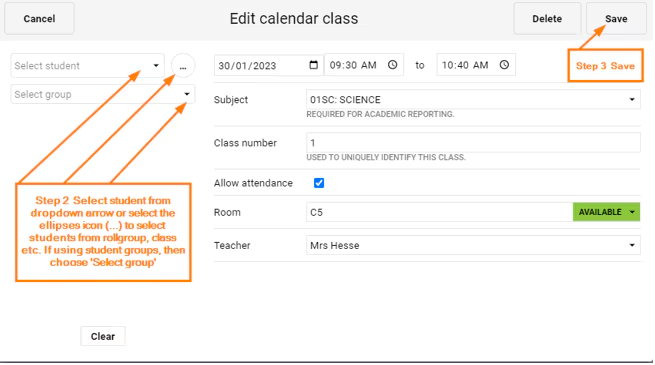
Enrolling Students into Calendar Classes
- Select the ‘Edit entry’ icon
- Select the student/students from the ‘Select student’ dropdown arrow or via the ellipses icon (…) Alternatively when using student groups, select students from the ‘Select group’ dropdown arrow.
- Save
Deleting Calendar Classes
- Go the the Teaching Workspace > Timetable > Calendar.
- Select the first instance of the class that needs to be deleted.
- Click on the class and select then 'Edit' icon (pencil).
- Remove the students from the class by clicking on the 'Bin' icon next to the student name or clicking on the 'Clear' button. Once this has been done click on the 'Delete' button.
- Select 'Delete this instance only', or 'Delete this and all future instances' (this option will delete all instances of the class until the end of the timetable period).
Calendar Class Permissions
The following permissions are required to create Calendar Classes:
- 'CALENDAR:EDIT' - This permission allows staff to create classes on their own timetable.
- 'CALENDAR:EDITALL' - This permission allows staff to create classes on behalf of other staff.
Was this article helpful?
That’s Great!
Thank you for your feedback
Sorry! We couldn't be helpful
Thank you for your feedback
Feedback sent
We appreciate your effort and will try to fix the article